Are you in the mood to create a warm and personalized blanket? Making a fleece tie blanket is a fun and rewarding DIY project. It enables you to tailor a soft and warm blanket to your liking. In this article, we will take you through the simple steps of creating your own fleece tie blanket. Get ready to snuggle up in style!
A list of materials you’ll need for your fleece tie blanket project
- Two pieces of fleece fabric, both pieces measuring the required size of your blanket
- Fabric scissors
- Ruler or measuring tape
- Fabric marker or chalk (optional)
- Pins (optional)
Choosing the Right Fleece
When it comes to fleece, there are various types and patterns to choose from. Here are a few popular ones:
- Solid Fleece:This is a classic option with a single solid color. It’s versatile and great for creating a clean and simple look.
- Printed Fleece:If you want something more eye-catching, printed fleece is the way to go. You can find an extensive variety of patterns, such as florals, animals-print, geometric designs, and more.
- Anti-Pill Fleece:This type of fleece is specially designed to resist pilling, which are those annoying little balls that can form on the fabric over time. It’s a durable option that stays looking fresh for longer.
- Sherpa Fleece:Sherpa fleece has a soft and furry feel on one side, mimicking the appearance and texture of sheep’s wool. It’s perfect for creating cozy blankets or outerwear.
- High-Pile Fleece:High-pile fleece has longer fibers, giving it a plush and luxurious feel. It’s ideal for making blankets or clothing items that require extra warmth.
A few tips to keep in mind while making a fleece tie blanket:
- Consider the Weight:Fleece comes in different weights, ranging from light to heavy ones. If you’re making a blanket for warmer weather, a lighter weight fleece might be more suitable. For colder climates or extra coziness, opt for a heavier weight fleece.
- Check the Quality:Look for fleece that is well-made and has a good thickness. You want a fabric that feels soft and durable, as it will ensure your blanket lasts for a long time.
- Think about Pattern and Color:Choose a pattern or color that matches your personal style or the theme you have in mind. Whether it’s a bold print or a soothing solid color, make sure it’s something you’ll love snuggling up with.
- Consider the Purpose:Think about how you’ll be using the blanket. If it’s for outdoor activities, you might want a more rugged and water-resistant fleece. If it’s for indoor use, focus on softness and comfort.
- Test the Stretch:Gently pull on the fabric to see how much it stretches. Fleece with a good amount of stretch will be easier to work with when tying the knots for your blanket.
The right fleece for your blanket is ultimately a matter of personal preference. Trust your intuition and work with what feels right to you.
Preparing the Fleece
Before starting with your project, it is good to wash and dry the fleece. Most types of fleeces can be machine washed gently using cold water. Use a mild detergent and refrain from using fabric conditioners as they can affect the fleece’s texture.
After washing, dry on low heat or air dry. Be sure to take out the fleece from the dryer at once to avoid the fleece from wrinkling.
Ironing fleece is generally not necessary as it is a low-maintenance fabric. However, if you find that your fleece has wrinkles or creases, you can use a low heat setting on your iron or a garment steamer to remove them. Remember to test a small, discreet area first to guarantee that the heat does not damage the fabric.
Keep in mind that excessive heat can melt or damage the fleece, so it’s important to use the lowest heat setting possible. You can also place a thin cloth or towel between the iron and the fleece to provide an extra layer of protection.
Measuring and Cutting
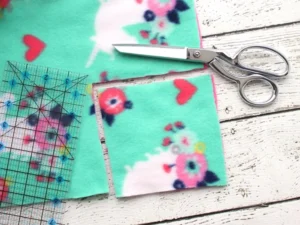
How to measure and mark the dimensions of the blanket:
To measure and mark the dimensions of your blanket, start by laying out your fleece fabric on a flat surface. Use a measuring tape to achieve the anticipated measurement of your blanket. Once you have the measurements, use fabric chalk or a washable marker to mark the dimensions directly on the fabric. This will help to assist cutting.
Guide on cutting the fleece into the desired size and shape:
When it comes to cutting the fleece into the desired size and shape, carefully follow the marked dimensions. Using sharp fabric scissors, start cutting on the marked lines. Cut through the layers of fleece if you’re using two pieces. Take your time and make even slashes to guarantee a neat finish. It is important to be precise with your measurements and cuts to ensure that your blanket turns out the way you want it.
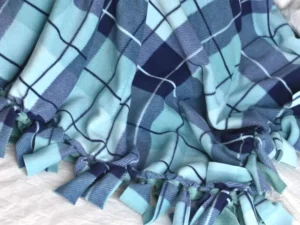
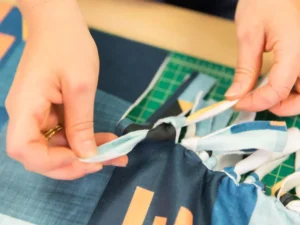
Tying the Blanket: The Main Step
Let’s go through the process of tying the fringe to secure the layers of your blanket together:
Creating the Fringe: Start by cutting strips along the edges of your blanket, leaving about 4-6 inches of uncut fabric at the top. These strips will form the fringe. Make sure the strips are evenly spaced and of equal width.
Tying the Fringe: Take one strip of fringe from each of the layers of fleece fabric. Tie them together in a double knot, safeguarding the layers of fleece. Repeat this process for each set of fringe strips adjacent to the edges of the fleece blanket.
Continue Tying: Work your way around the entire blanket, tying the corresponding fringe strips together. Ensure that the knots are fitted and protected.
Finishing Touches: Once you’ve tied all the fringe strips, take a moment to fluff and adjust the knots to ensure they are evenly spaced and visually appealing.
And voila! You’ve successfully tied the fringe to secure the layers of your blanket together. It’s a fun and artistic way to add attractive details to your creation.
Personalizing the Blanket (optional)
- Embroidery:Choose a design or pattern that you like, and use an embroidery hoop to keep the fabric taut while you work. You can use different embroidery stitches like backstitch, satin stitch, or French knots to create different effects.
- Appliques:Start by cutting out the desired shape or design from a different fabric. Then, pin it onto the blanket and sew it on using a sewing machine or by hand. You can also add extra details by stitching around the edges of applique
The Finishing Touches
To trim any excess fabric or threads from your blanket, here’s what you can do:
- Get a pair of sharp fabric scissors that are suitable for cutting fleece.
- Carefully examine the edges of your blanket, looking for any loose threads or uneven fabric.
- For loose threads, gently pull them away from the blanket. Be careful not to pull too hard, as you don’t want to damage the fabric.
- If you notice any uneven fabric or excess material sticking out, use the fabric scissors to trim it away. Make sure to cut the fabric in a straight even line and take your time to achieve a clean and neat edge.
- Continue inspecting and trimming any areas that need it until you’re satisfied with the overall appearance of your blanket.
Remember to take your time and be alert while trimming to avoid accidentally cutting into the main fabric. Once you’re done, your blanket will look even more polished and ready to be enjoyed.
Care Instructions for your Fleece Tie Blanket
Taking care of your blanket is important to keep it cozy and in great condition. Following are a few tips for cleaning and caring for your blanket:
- Regularly brush off any slack dirt or remains from the blanket.
- Wash gently with cold water and a mild cleaner precisely intended to clean fleece or delicate fabrics.
- Refrain from using bleaching agent or severe chemicals, as they can harm the fabric.
- To maintain the softness and fluffiness of the blanket, consider using a fabric softener during the wash cycle or a dryer sheet during the drying process. This can help keep the fibers smooth.
- Air drying is the finest choice to dry fleece blankets. Lay it flat on a clean surface or hang it up to dry. If you prefer using a dryer, select a low heat setting to stop unnecessary reduction or damage to the fabric.
- Once your blanket is dry, you can give it a quick fluff by gently shaking it or using a soft brush to restore its plushness.
- Store your blanket in a clean, dry place when not in use to protect it from dust and potential damage.
Conclusion
Creating a fleece tie blanket is a fun and easy DIY project that everybody can do. By following these simple steps, you can create a cozy and personalized blanket that’s perfect for snuggling up on chilly nights or gifting to loved ones. Choose your favorite fleece patterns, take your time with the tying process, and enjoy the satisfaction of creating something beautiful with your own hands. Happy crafting and stay cozy!